How to Convert Images to JPG with Format Factory
JPG is the most universally compatible image format, which makes it the most common conversion target — here's every real path into it, confirmed on the installed app.
HEIC to JPG (iPhone photos)
This is the single most common reason people look for a JPG converter. iPhones save photos as HEIC by default, and while Format Factory has no direct HEIC output button, it reads HEIC perfectly well as a source format — add your HEIC photos to the Image panel and convert to JPG the same way as any other format.
PNG / WebP to JPG
Both convert to JPG through the same panel. Keep in mind PNG and WebP support transparency and JPG doesn't — any transparent areas will be filled with a solid background (typically white) once converted.
RAW (CR2 / CR3 / ARW) to JPG
We couldn't confirm camera RAW formats as a supported source in our own testing of the Image panel's format list. If your workflow specifically needs RAW conversion, a dedicated RAW processor (like your camera manufacturer's own software, or a tool such as darktable) is the safer choice until we can verify this directly.
JPG to PNG / PDF
Going the other way, JPG converts to PNG through the Image panel, or to PDF through the separate “Pic→PDF” tool in the Document section — useful for turning a batch of scanned JPG pages into a single shareable PDF.
Get Format Factory 5.22.0.0
~163 MB, 64-bit Windows only, published by Free Time Software Technology Co., Ltd.. Go to the download page for the official link, the exact byte size to check it against, and a safe-download checklist.
Only 64-bit Windows 7 / 8 / 10 / 11 are supported.
Step-by-step JPG conversion
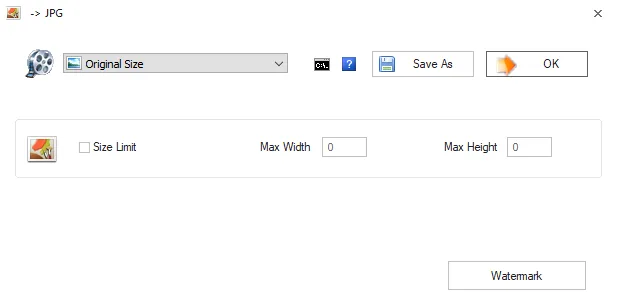
Open Format Factory and select the Image panel, then click the "→JPG" button.
Click "Add File" and select your source images — HEIC, PNG, WebP, BMP, GIF, TIF, and TGA sources all work the same way. Add multiple files at once for a batch conversion.
Open "Configurar Destino" to adjust JPG quality (90 is the default) or resize/rotate before converting.
Choose your output folder and click Start.
More JPG conversion questions
Why do my converted iPhone photos look slightly different in JPG?
HEIC uses a more efficient, modern compression scheme than JPG, so converting between them involves decoding one format and re-encoding into another — at the default quality setting (90), differences are generally not visible to the eye, but pixel-level analysis could show minor compression differences. If you need maximum fidelity, raise the JPG quality setting in output options before converting.
Is JPG or PNG better for scanned documents?
For text-heavy scans, PNG's lossless compression avoids the blurring artifacts JPG can introduce around sharp text edges — worth using if legibility matters more than file size. For photos, JPG's smaller file size is usually the better trade-off.
What JPG quality setting should I use?
The default of 90 (out of 100) in our tested install is a solid middle ground — visually near-lossless for most photos while still compressing meaningfully. Drop to 70–80 for web use where file size matters more, or push toward 95–100 for images you might print or edit further later.
Converting a full camera roll to JPG at once
When you're converting an entire iPhone camera roll export — often hundreds of HEIC files — select the whole folder when adding files to the Image panel rather than adding photos one at a time. Format Factory queues every file and applies the same JPG quality setting across the whole batch, so it's worth confirming your quality and resize settings on a single test photo first before committing to converting the full set.
What to expect for JPG file size
JPG's compression is significantly more aggressive than most source formats it replaces — in our own test, a 1.98 MB PNG screenshot converted down to roughly 313 KB as a JPG at the default quality setting, around 85% smaller. That kind of reduction is typical for photo-like content; graphics with sharp edges or text tend to compress less dramatically and can show more visible artifacting at lower quality settings, which is worth checking against the resize & rotate guidance on our image converter hub.
The short version
HEIC, PNG, WebP, BMP, GIF, TIF, and TGA all convert to JPG through the same “→JPG” button in the Image panel — the HEIC path specifically is the one most people are looking for, since it's how iPhone photos become universally readable. RAW camera formats remain an open question we couldn't confirm, so verify directly before relying on this tool for that specific workflow.
For quality, the default setting of 90 balances size and fidelity well for most photos; adjust up or down in the destination configuration dialog depending on whether the output is headed for print, the web, or just casual sharing.
A note on repeated JPG conversions
Because JPG is a lossy format, converting a JPG to JPG again (say, after an edit) introduces a small additional quality loss each time — not usually noticeable for a single re-save, but worth avoiding as a repeated habit. Where possible, keep edits on a lossless master (PNG or the original HEIC) and export to JPG only once, at the end of your workflow.
The practical takeaway
If you came here specifically to deal with iPhone HEIC photos, that's the single most reliable use case on this page — add, convert, done. For anything more specialized, like RAW camera files, verify support directly before committing a large batch to this workflow.